Light Requirements
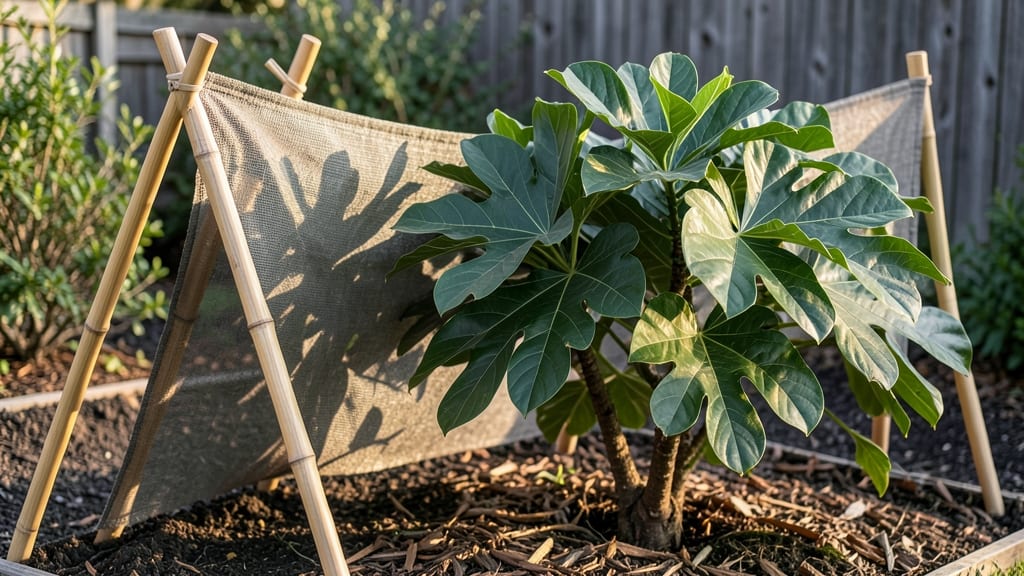
This DIY shade for plants—made from scrap fabric and a sturdy frame—saved my sun-scorched lettuce, turning it into crisp, thriving greens within weeks. 🌿 The right light filtering protects delicate plants from harsh afternoon rays while keeping them productive—no more bolting or wilted leaves by noon.
I’ve tested everything from cheap fabric to purpose-built shade cloth, and the best solutions balance cost, durability, and adjustability.
You’ll need basic supplies: shade cloth (30-50% block for most veggies), stakes or a frame, and zip ties or rope. For a quick fix, drape fabric over a trellis or use old window screens—both work surprisingly well.
The key is positioning: place shade to block the strongest sun (usually west-facing) while allowing morning light for photosynthesis.
With the right setup, you’ll see plants like basil and spinach stay lush and productive all season. The cloth also extends the growing window for heat-sensitive crops, giving you a second harvest when others give up.
Plus, it’s easy to adjust as seasons change—just move it higher in summer or lower in spring.
Works for containers, raised beds, or in-ground gardens. Start with a small section to test what works best for your space and plants—you’ll wonder why you didn’t do this sooner!
📚 In This Guide
- What you need
- Instructions
- Tips and common mistakes
- Wrapping up and next steps
What you need
- ● Shade cloth fabric – Choose between: 30-50% shade cloth (for bright indirect light, ideal for seedlings or tropical plants)
- ● 50-70% shade cloth (for moderate sun protection, perfect for veggies like lettuce or basil)
- ● 70-90% shade cloth (for intense sun or delicate blooms like orchids)
- ● Measuring tape – Flexible, at least 16 ft long for accurate sizing.
- ● Scissors or fabric shears – Sharp blades prevent fraying for clean cuts.
- ● Heavy-duty stapler or stitching machine – For securing edges or hemming.
- ● Staple gun + staples – OR strong thread + needle (if hand-sewing).
- ● Wooden dowels, PVC pipes, or metal rods – For hoops or frame support (1/2"–1" diameter, cut to desired length).
- ● Zip ties or bungee cords – To attach shade cloth to frames or trellises.
- ○ Garden stakes or T-posts – For anchoring freestanding frames (optional for portable setups).
- ● Reflective bubble wrap – Attach to the underside of shade cloth to increase light diffusion (great for greenhouses!).
- ● UV-resistant spray – Extends fabric lifespan by blocking sun damage.
- ● Fabric glue or hem tape – For a no-sew finish on edges.
- ● Decorative trim or bias tape – Adds a polished look to DIY frames.
- ● Thermometer/hygrometer – Monitor temperature/humidity under shade for optimal plant conditions.
Step-by-Step guide to making DIY shade cloth for delicate plants
Here's how to create a custom, adjustable shade solution that protects your greens without breaking the bank.
🪴 Step 1: Measure Your Plant Area and Choose Fabric
Start by measuring the space you need to cover—take the width and length of your garden bed or container area. For delicate greens, I recommend using lightweight, breathable fabric like 50% shade cloth (for medium sun protection) or 70% shade cloth (for hot climates). You can also use cheesecloth for very young seedlings or white cotton fabric for a softer light filter.
If you're making a freestanding frame, measure the height you need (usually 3-4 feet for most greens). For a simple drape, just measure the area you want to cover and add 12 inches to each side for secure attachment. I like to use staple guns for temporary setups or zip ties for quick adjustments.
🌿 Step 2: Build or Adapt a Support Frame
For a sturdy setup, use wooden dowels, PVC pipes, or bamboo stakes to create a frame. For a 4-foot by 4-foot area, cut four 4-foot dowels and assemble them into a square using zip ties or screws. If you're working with containers, bendable wire hoops work great for draping fabric over pots.
For a no-frame option, simply drape the fabric over tall stakes or trellises already in place. The key is keeping the fabric 6-12 inches above the plants to allow airflow and prevent rot. If you're using cheesecloth, you can even pin it directly to the soil with small garden staples for a lightweight solution.
✂️ Step 3: Cut and Attach the Fabric
Cut the fabric to fit your frame or measured area, leaving 2-3 inches extra on all sides for securing. If using a frame, drape the fabric evenly and staple or tie it tightly at the corners and along the edges. For a draped setup, fold the excess fabric inward to create a neat finish and clip it to stakes or hooks with clothespins or binder clips for easy removal.
Test the fit by gently shaking the fabric—it should move slightly in the breeze but stay taut enough to block light evenly. If gaps appear, reinforce with additional staples or ties. For a customizable shade, leave the sides open and use adjustable clips so you can roll up the fabric as plants mature and need more light.
☀️ Step 4: Test and Adjust for Light Control
Place your shade setup over the plants and observe how much light filters through. If leaves look too pale, you're blocking too much light—try a lighter fabric or raise the frame slightly. If leaves appear burned or crispy, the shade isn’t dense enough—switch to a higher percentage shade cloth or lower the fabric closer to the plants.
For delicate greens like lettuce or spinach, start with 30-50% shade and monitor daily. After a week, adjust based on leaf color and growth. I like to check at midday when the sun is strongest—this is when you’ll see the most stress signs. If you notice wilting or yellowing, the fabric may be too tight or blocking too much airflow.
🔄 Step 5: Maintain and Modify as Needed
Check your DIY shade setup weekly for wear and tear, especially if using outdoor fabric. Replace any torn or stretched sections immediately to maintain protection. For long-term use, consider waterproofing with a light spray of fabric sealant to extend the life of your shade cloth.
As your plants grow, they’ll need more light—gradually remove sections of the fabric or raise the frame higher. By the time greens are fully mature, you may only need partial shade for a few hours a day. Store unused fabric in a dry, shaded area to prevent mildew and keep it ready for next season.
Tips & tricks for perfect DIY shade solutions
Here's what nobody tells you about creating shade setups that actually work for your delicate plants.
Fabric Selection Matters: The percentage of shade cloth you choose makes all the difference. In Step 1, when selecting fabric, remember that 50% shade cloth blocks about half the sunlight while still allowing plenty of light for photosynthesis. For hot climates, 70% shade cloth is ideal, but it can be too intense for seedlings—start with 30% shade and gradually increase as plants grow. Cheesecloth is perfect for the most delicate seedlings but won't provide enough protection for mature plants in intense sun.
Frame Stability is Key: When building your support frame in Step 2, don't skimp on stability. The 4-foot dowels mentioned for a 4x4 area should be firmly secured with zip ties or screws—I've seen setups collapse under wind if corners aren't properly reinforced. For container gardens, bendable wire hoops are fantastic because they conform to different pot shapes while maintaining that crucial 6-12 inch clearance above plants. This airflow space prevents moisture buildup that can lead to fungal issues.
Adjustable Shade is the Ultimate Game-Changer: The instructions mention leaving sides open for customization, but here's the real trick: Use adjustable binder clips along the edges of your draped fabric. This lets you easily roll up sections as your plants mature, giving them more light without removing the entire shade. I've seen lettuce go from wilting to thriving in just days when I adjusted the shade this way during hot afternoons. Check your setup at midday when the sun is strongest—this is when you'll notice the biggest differences in plant response.
Maintenance Prevents Long-Term Problems: That weekly check mentioned in Step 5 isn't just about fixing tears—it's about catching early signs of fabric degradation. I've found that a light spray of fabric sealant every few months extends the life of outdoor fabrics dramatically. Store extra fabric in a dry, shaded area (like a garage or under a porch) to prevent mildew. The key is keeping it clean and dry when not in use—this simple step can mean the difference between a shade cloth that lasts one season and one that works for years.
Pro Tips for Diy Shade For Plants
- Here's what nobody tells you about creating shade setups that actually work for your delicate plants.
- Fabric Selection Matters: The percentage of shade cloth you choose makes all the difference.
- Frame Stability is Key: When building your support frame in Step 2, don't skimp on stability.
Frequently asked questions
Got questions about creating DIY shade for your plants? You’re not alone! Here are answers to the most common concerns—so you can protect your greens with confidence.
What’s the best DIY shade cloth material for delicate plants?
For tender plants like ferns or seedlings, opt for lightweight, breathable fabrics like cheesecloth (30-50% shade) or cotton muslin (50-70% shade). Avoid plastic sheets—they trap heat and limit airflow. If you’re crafty, even old bedsheets or window screens work in a pinch!
How long does homemade shade cloth last before degrading?
Natural fabrics like cotton or linen typically last 1-2 growing seasons if stored dry and protected from UV rays. For longer use, treat them with fabric stiffener or waterproofing spray (test a small patch first!). Plastic alternatives (like repurposed CD cases) may last longer but risk overheating—monitor temps closely!
Can I adjust the shade percentage mid-season as plants grow?
Start with 50% shade for young plants, then gradually remove layers (e.g., fold cheesecloth or add mesh) as they harden. Pro tip: Use clips or staples to create adjustable panels. Watch for yellowing leaves—a sign of too much sun or shade!
Are there budget-friendly alternatives to store-bought shade cloth?
Yes! Try these thrifty swaps:
- Cheesecloth or coffee filters: 30-40% shade (great for seedlings).
- Window screens: 50-60% shade (secure with zip ties).
- Burlap sacks: 70%+ shade (ideal for heat-sensitive plants).
- Old white T-shirts: Stretch over frames for even coverage.
Just rinse and reuse—eco-friendly and wallet-friendly!
Will DIY shade attract pests like aphids or fungus gnats?
Moisture buildup is the real culprit! Ensure your shade setup is well-ventilated (leave gaps at the bottom) and avoid water pooling. If pests appear, neem oil sprays or sticky traps work wonders. Never use plastic—it traps humidity and invites problems.
Wrapping up and next steps
Creating your own DIY shade cloth for plants is a game-changer for protecting your greens from harsh sunlight—without breaking the bank! 🌿 With just a few household materials, you’ve unlocked a customizable solution that keeps your delicate plants thriving.
Whether you’re shielding seedlings, reviving sunburnt leaves, or extending growing seasons, your newfound skills will make you the plant whisperer of your neighborhood.
Now that you’re armed with knowledge, take the next step! Start small—try a single container or a section of your garden—and experiment with different shades. Watch your plants flourish and adjust as needed. Happy gardening! 🌱✨